On Windows XP and earlier versions, taking screenshots on a PC was not exactly easy. Users needed to press the Print screen to capture the full screen or Alt + Print hotkey to snap the currently active window and then paste it in the native Paint application.
With Windows Vista, Microsoft introduced a free screen grabbing tool called Snipping Tool and the tool has been updated in Windows 10 to support timed capture. The Snipping Tool in Windows 10 gets Delay snip feature which allows you automatically take the snap after 1, 2, 3, 4 or 5 seconds. After launching the tool, you just need to click the Delay button and select how long should the Snipping Tool wait before capturing the screen.

Although many users prefer using third-party screen capturing tools like Greenshot, the Snipping Tool is good enough for basic screen capturing jobs and works great for occasional screen grabbers.
Some useful tips for Snipping Tool users on Windows 10
If you often use the Snipping Tool, following are some useful tips and tricks to make the most of it.Pin Snipping Tool to the taskbar
If you love to get things done using keyboard shortcuts, then consider pinning Snipping Tool to the taskbar, so that you can quickly access it from mouse as well as keyboard shortcut. Right-click on the Snipping Tool on the Start menu (search if you can’t find) and then click Pin to taskbar option.

On my PCs, I always pin the Snipping Tool right after the Start button so that I can get access to it using Windows + 1 hotkey.
Create a dedicated keyboard shortcut
Many of you might prefer keeping your taskbar clean and you might not like the idea of pinning Snipping Tool to the taskbar. In that case, you can create a dedicated hotkey to launch Snipping Tool.
To create Snipping Tool keyboard shortcut:
Step 1: First, create a shortcut of Snipping Tool on the desktop. This can be done by dragging or dropping Snipping Tool from the Start menu to the desktop.

On Windows 10 Start menu, navigate to All apps > Windows Accessories to find the Snipping Tool. Or, simply use the search to quickly find it.
Step 2: Right-click on the Snipping Tool shortcut on the desktop, click Properties.

Step 3: Under the Shortcut tab, click the field next to the Shortcut key, and then press “S” key to assign Ctrl + Alt + S, or press “P” key to assign Ctrl + Alt + P for Snipping Tool.

Don’t forget to click the Apply button. From now onwards, you can use the new hotkey to launch the Snipping Tool.
Use Snipping Tool to capture menus
One of the common complaints about Snipping Tool is that it can’t be used to capture menus. The truth is that Snipping Tool allows you capture menus (since its time in Vista) and other pop-ups, but the procedure is not very straight forward.

Here is how to capture a menu:
Step 1: Before opening the menu or popup that you want to capture, launch Snipping Tool.
Step 2: Click New button or press Ctrl+N to start a new instance.
Step 3: Press the Esc key on the keyboard now. Don’t close the Snipping Tool yet.
Step 4: Open the menu or pop-up that you want to capture.
Step 5: Finally, simultaneously press Ctrl + Print keys to resume the Snipping Tool, choose the type of snip you want (full-screen, window or portion of screen), and capture the menu or popup. As simple as that!
Change the selection ink color
The default ink color used for the selection is Red but can be changed to a color of your choice. Here is how to do that:
Step 1: Open Snipping Tool and click Settings icon.
Step 2: Under Selection section, click the drop-down menu to select a color from the available 16 colors. We suggest you use a dark color so that you can easily view the edge of the selection.

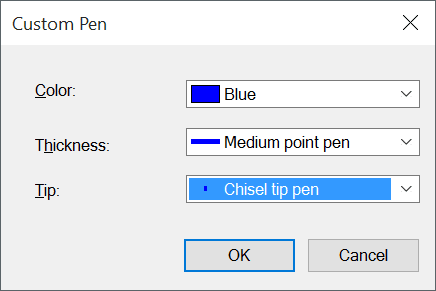
Change pen’s ink color, tip and ink thickness
Whenever you capture a portion of the screen, full screen or a window, the Snipping Tool shows email, pen, eraser, and highlighter icons in the toolbar. By default, the pen uses Blue color, medium thickness and chisel tip but you can change them as well.

Click the down arrow next to the Pen in the toolbar, click Customize and then choose a color, pen thickness and tip type. Click Ok to save your changes.
The Eraser doesn’t let you erase what you have captured!
Not exactly a tip, but might help you while using it. It’s fairly common for users to assume that the eraser tool is present to erase a portion of the captured image. But the eraser in the Snipping Tool is there to undo what you have done to the captured image using the pen or highlighter. Yes, it does erase the changes made by pen and highlighter without erasing the what’s there on the captured image. The Ctrl + Z doesn’t work here!
Comments
Post a Comment